AWS Security and Server Infrastructure | |
|
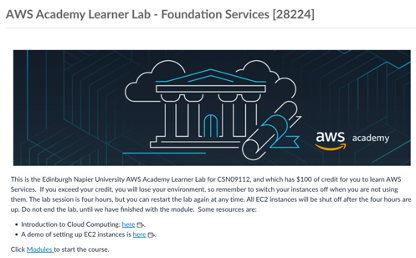
The aim of this lab is setup AWS server instances and understand the setup of key security aspects. Activities
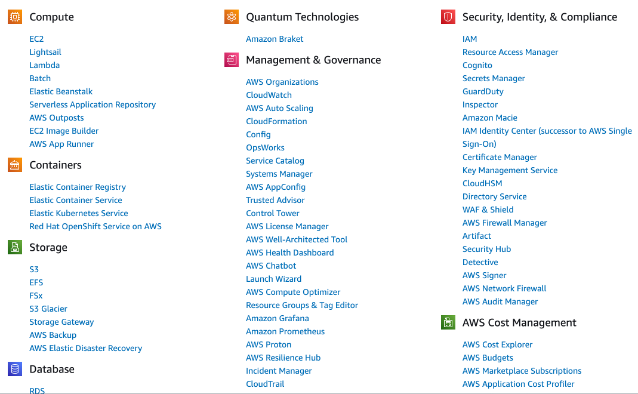
A OutlineIn previous labs we have set up a range of architectures with VMWare vSphere. This is a private cloud environment and creates infrastructure-as-a-service. Increasingly, we use the public cloud to build our information systems, and which reduces the cost in the investment in data centre costs, while providing the opportunity to quickly scale our server, network and data infrastructure. It is generally as pay-as-you-go model, and where we pay for CPU time, network bandwidth and data costs. The most popular public cloud provider is AWS (Amazon Web Services), and which provides EC2 (for compute), S3 (for data buckets), RDS (for databases) and AWS Network Firewall (for firewalls). Some of these services are outlined in Figure 1. A lab is [here]
Figure 1: AWS Services B Enabling your labYou should have an AWS Academy login, so go to: https://awsacademy.instructure.com/ and log into the system and select AWS Academy Learner Lab (Figure 2).
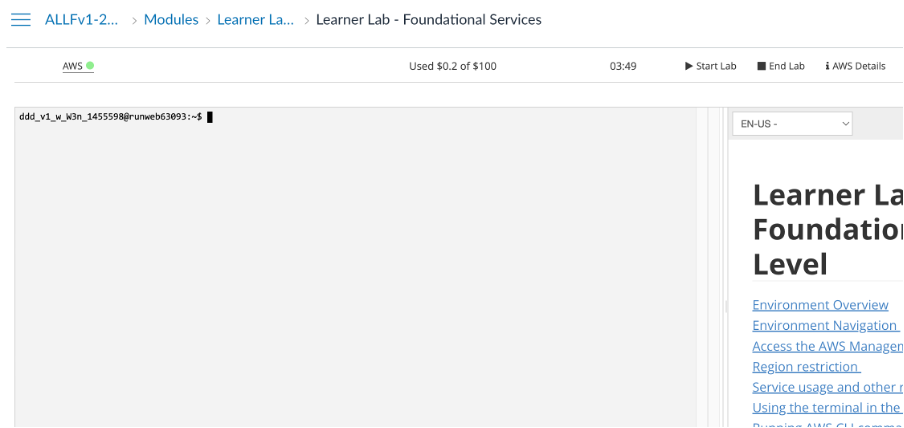
Figure 2: AWS Academy Learner Lab Next, select “Modules”, and then “Learner Lab - Foundational Services”, and should have the lab environment (Figure 3).
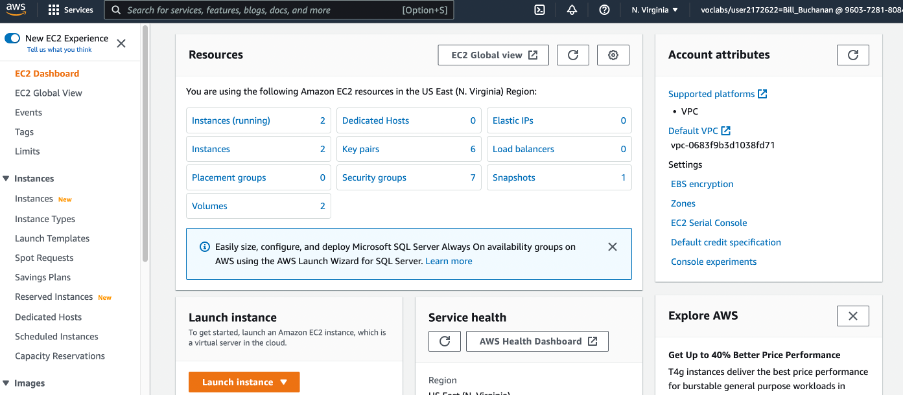
Figure 3: AWS Academy Learner Lab environment In the console you can interact with your AWS though the console (as you are already logged into AWS). Now, press the “Start Lab” button, and wait for the AWS light to go green. Once, green, you can click on it, and open up your AWS Management console. After this, just select EC2, and you should see your EC2 environment.
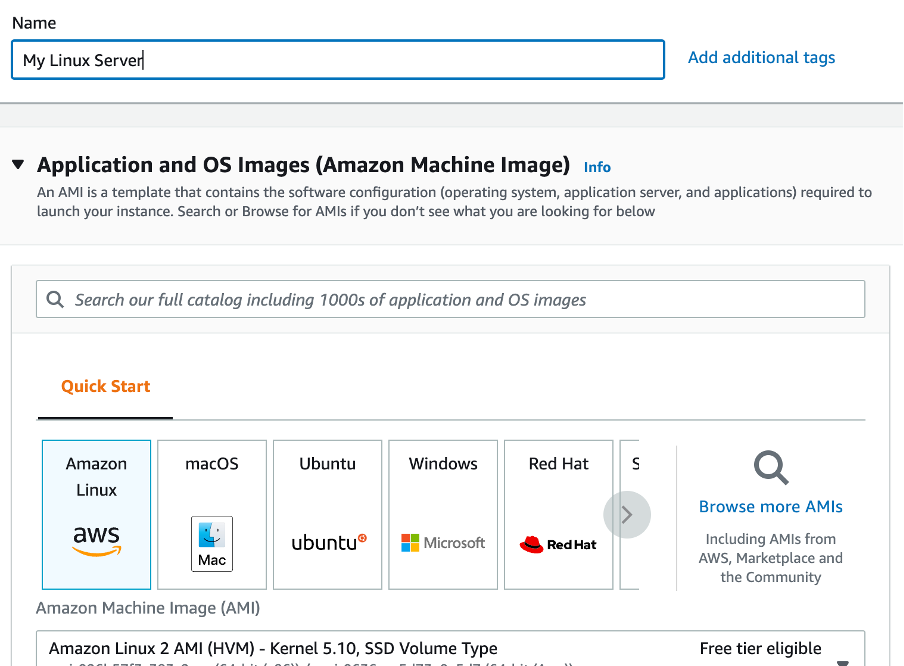
Figure 4: AWS Management Console (EC2) C Creating and Securing a Linux ServerWe will now create a Linux Server, and which should be accessible from the Internet. For this select “Launch Instance”, and then give it a name (such as “My Linux Server”) and select the Amazon Linux instance for the AMI (Amazon Machine Instance) – as shown in Figure 5.
Figure 5: Creating Amazon Linux instance Now select t2.micro for the instance type. How many vCPUs will the instance have? How much memory will it have? How much will it cost per day to run? If you selected, t2.medium, how much would it cost per day? If you selected, t2.large, how much would it cost per day? Now create a new key pair and save it to your local drive. This file contains your private key, and which you will need to connect to your instance. Accept all the other defaults.
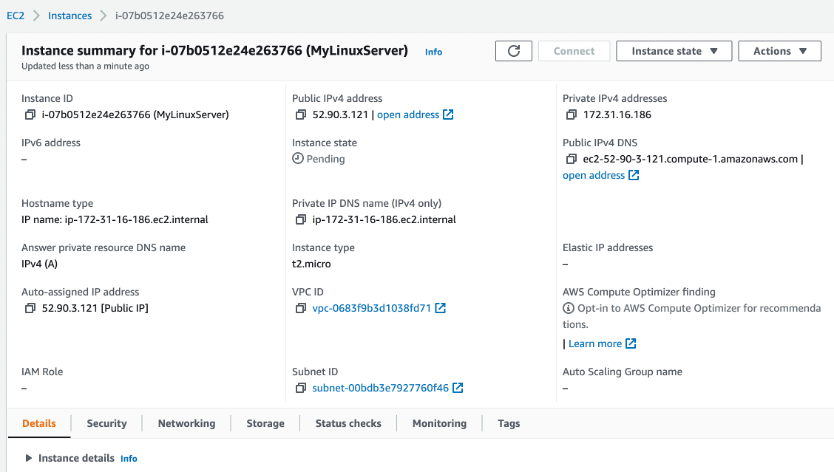
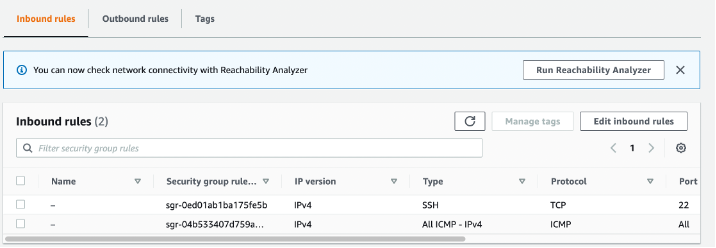
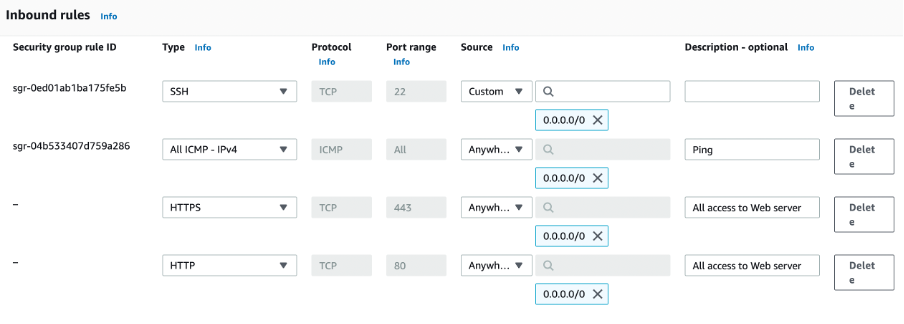
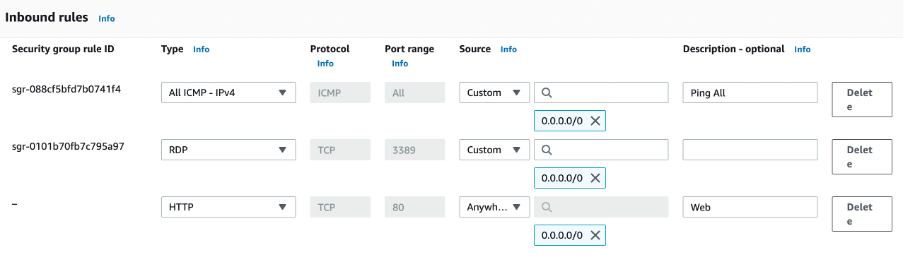
Observe the firewall group that will be applied.

Which firewall ports are open on the instance?

What do you think is the main issue with this firewall setting?

How would you change it, once you have created the instance?


Observe the disk storage setting for the instance.

What type of disk will be used? [HDD/SSD]

What do you think is the advantage of using SSD?

For disk storage, what is the default size of the disk that you will create?

What is the maximum storage size for a free tier storage of the AMI instance we are creating?
C.1 Creating the instanceGo ahead and create the instance. Then go back to the AWS Management Console, and find your instance. Wait for it to set its state to running. Now we will connect to it. For this we need to create an SSH connection and use the private key we have generated. The public key will be stored on the instance and will authenticate our access. We do not need a username or password to access the instance, as this is often insecure. Our PEM file will give us access (or you can use Putty for the connection). Now, we will examine the details of our instance (Figure 6). On the instance summary, determine the following: The public IP address: The private IP address: The instance type: The public IPv4 DNS: From your local host, can you ping the public IP address? [Yes/No] Why can’t you successfully ping your instance? Which region of the world is your instance running in? C.2 Enabling ICMP on firewallNow, we will enable ICMP on the instance. First click on the Security tab of the instance summary, and then on the security group.What is the firewall rule that is applied to the instance? [SSH/Telnet/FTP/HTTP/HTTPs] for [0.0.0.0/0 or 0.0.0.0/8 or 0.0.0.0/16 or 0.0.0.0/32] What does 0.0.0.0/0 represent?Now go ahead and add an ICMP rule for all hosts (Figure 7). Can you now successfully ping your instance? [Yes/No] Now, lock your ICMP rule down to just your IP address (you need to use a /32 address for this). Can you still successfully ping the instance? [Yes/No] Ask you neighhour or one of the lab tutors to ping your instance. Can they successfully ping it? [Yes/No] What is the advantage of applying the firewall in AWS, rather than in the instance?
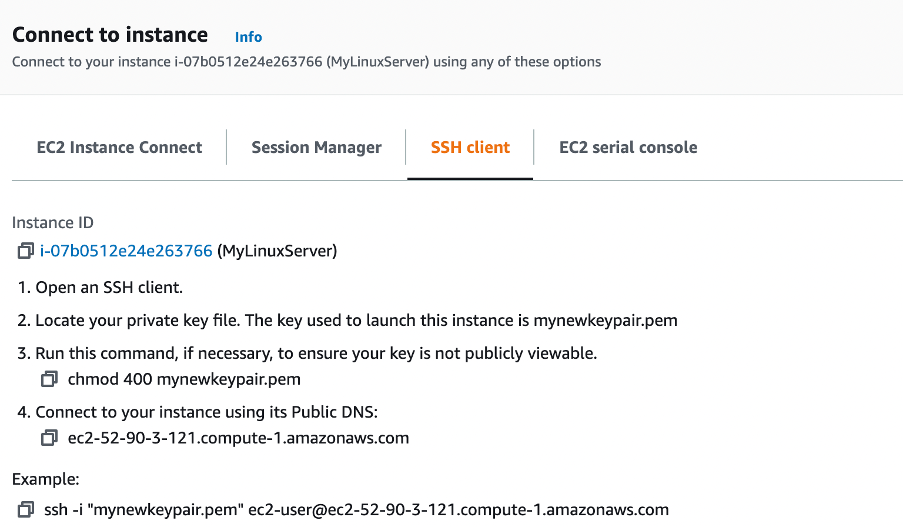
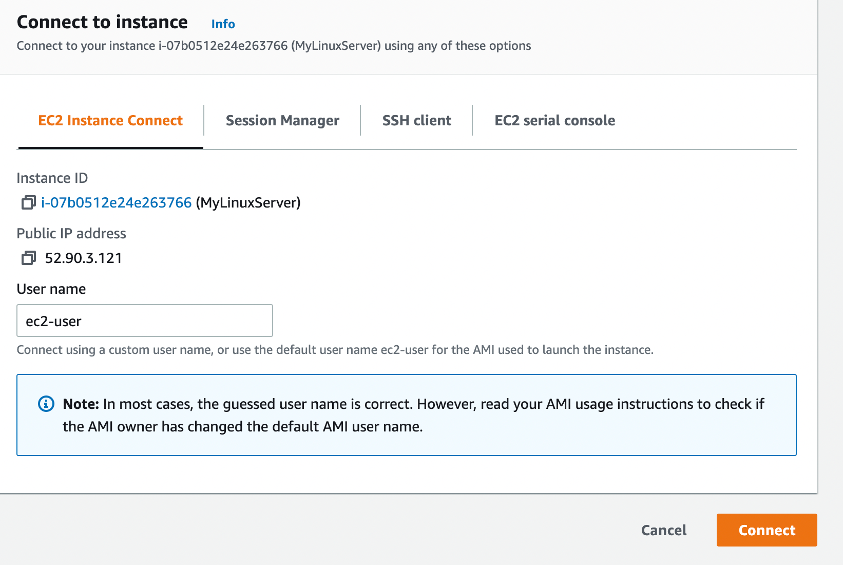
C.3 Accessing your instanceNow we will connect to our instance. For this you need SSH (such as provided by OpenSSH). This may be installed on the host you are using (such as in vSoC 2), or from Apps Anywhere. Once you have SSH, press Connect on the summary page, and you should then have tabs for Connect to instance (Figure 8). Next select the SSH client tab, and you will see the details of connecting to your instance with SSH.
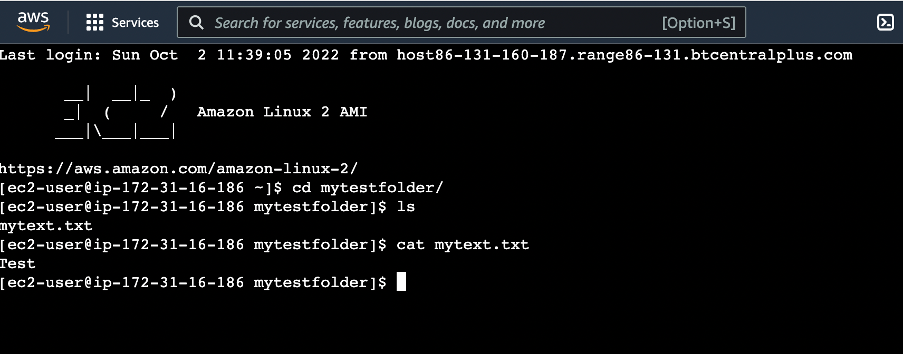
chmod 400 myfile.pemWhat protection does this put on your private key? Next, use the SSH connection with the name of your PEM file and with the DNS (or IP address) for your instance. For example, in the case in Figure 8, we have: ssh -i "mynewkeypair.pem" [email protected]What is the name of the user that logs in? An example of connecting is: % ssh -i "mynewkeypair.pem" [email protected] The authenticity of host 'ec2-52-90-3-121.compute-1.amazonaws.com (52.90.3.121)' can't be established. ED25519 key fingerprint is SHA256:/c5UOK6gprKL19XCptNQ1brb9MpYR5wEeqhD/6t+/Wk. This host key is known by the following other names/addresses: ~/.ssh/known_hosts:48: ec2-3-90-189-201.compute-1.amazonaws.com Are you sure you want to continue connecting (yes/no/[fingerprint])? yes Warning: Permanently added 'ec2-52-90-3-121.compute-1.amazonaws.com' (ED25519) to the list of known hosts. Last login: Fri Sep 30 17:07:00 2022 from ec2-18-206-107-27.compute-1.amazonaws.com __| __|_ ) _| (/ Amazon Linux 2 AMI ___|\___|___| https://aws.amazon.com/amazon-linux-2/ [ec2-user@ip-172-31-16-186 ~]$ Have you managed to connect? [Yes/No] By using “ip addr show” or “ifconfig” in your instance, what is the private IP address of it? Can you ping 8.8.8.8 from your instance? [Yes/No] Is there a folder named .ssh? [Yes/No] What do you think is the purpose of the file contained in .ssh? Now create a folder in the top level named “mytestfolder”, and put a new file in there named “mytext.txt” (and put some text in this file). Now go to the EC2 Instance Connect (Figure 9), and press on the Connect button. You should now get a console terminal in the browser. From your console (Figure 10), verify that your file has been created. Has it been created in the instance? [Yes/No]
Figure 9: EC2 Instance Connect
$ netstat -i | grep tcp
$ netstat -i | grep udp
Which of the main services are running: C.4 Installing a Web serverNow we will install a Web server on the instance with:sudo yum update -y sudo yum install -y httpd.x86_64 sudo systemctl start httpd.service sudo systemctl enable httpd.service Next open up a browser on your computer and access your instance for Web access. Can you connect to it? [Yes/No] Why can’t you connect to it? Now enable a firewall rule on Port 80 and Port 443 and allow access for Web traffic (see Figure 11).
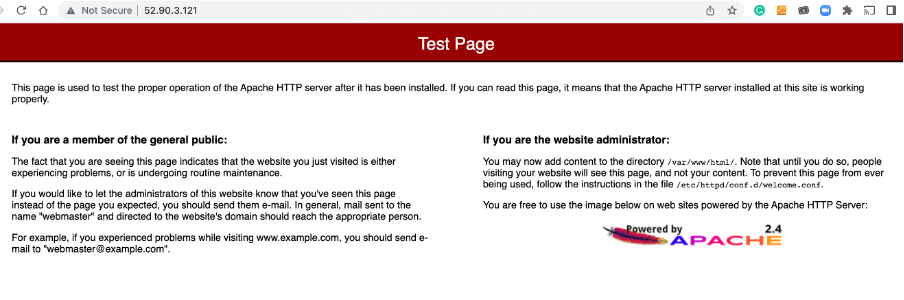
Figure 11: Enable HTTP and HTTPs rules Can you now connect to your Web site? [Yes/No] (see Figure 12)
<h1>Main Web site</h1>
<p>Hello to you</p>
And then save the file. Has it changed the welcome? [Yes/No] C.6 AuditingThe main logging output is in the /var/log folder. Go into this folder and observe some of the files in there. Identify the contents of the following files: What are the likely contents of the “secure” file? What are the likely contents of the “boot.log” file? List the log/httpd/access_log file. What are its contents? Can you identity your browser access? (see Figure 13). Which browser type accessed your Web server? Now try with another browser type (such as Firefox or Chrome) and re-examine the log/httpd/access_log file. Did it detect the new browser type? Now access a file that does not exist in your site (such as http://AWSIP/test.htm). Now re-examine the log/httpd/access_log file. What is the status code returned for the access?
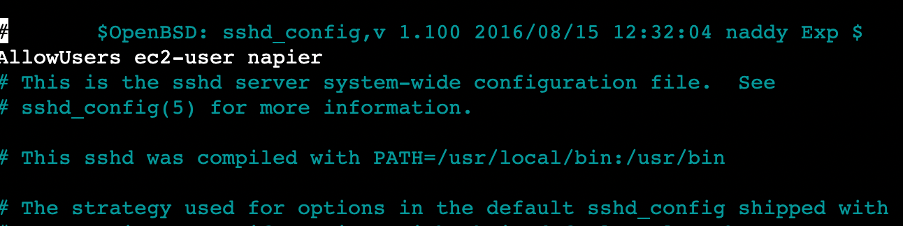
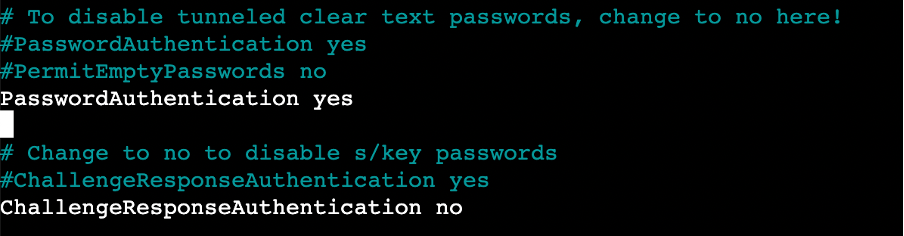
Figure 13: Sample list of log/httpd/access_log C.7 Adding a new userThe ec2_user can be used to connect back into the server using access authenticated with the private key. We will now create a new user named “napier”, and which can connect to the instance with SSH. For this we use adduser and passwd on the Linux instance: [ec2-user@ip-172-31-16-186 ~]$ sudo adduser napier [ec2-user@ip-172-31-16-186 ~]$ sudo passwd napier Changing password for user napier. New password: Now we will add the new user to the login. For this, we use: [ec2-user@ip-172-31-16-186 .ssh]$ sudo nano /etc/ssh/sshd_config Add line of (see Figure 15): AllowUsers ec2-user napier Change the following to “yes” (see Figure 16): PasswordAuthentication yes Now restart the SSH service with: [ec2-user@ip-172-31-16-186 .ssh]$ sudo systemctl restart sshd Can you now connect to your instance with the new user and password (but change for the IP address of your instance): ssh [email protected] Can you connect with the new user? [Yes/No]
Figure 14: Accessing instances
Figure 15: Accessing instances
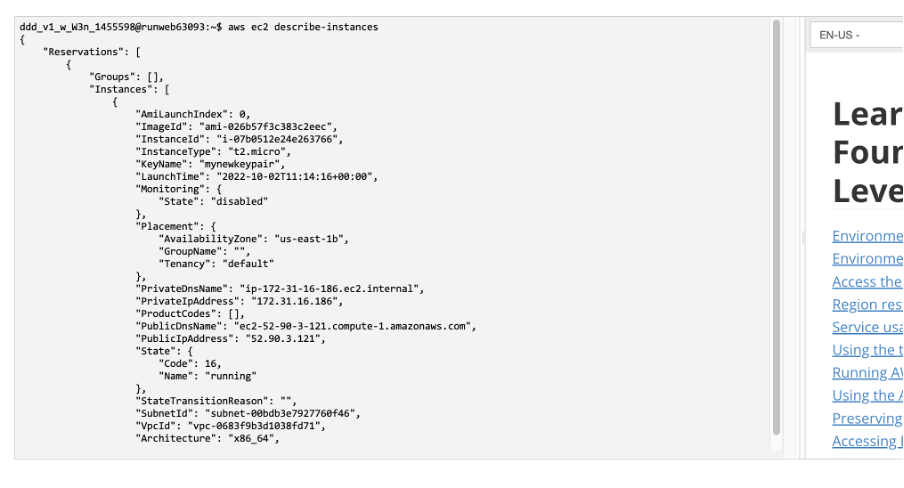
Figure 16: Accessing instances C.8 Accessing from AWS promptWe can also access our instance from the AWS terminal prompt. For this return to your AWS Academy console, and enter the command (Figure 17): $ aws ec2 describe-instances From the results, can you identify the following. Instance type: Public IP address: Private IP address: State:
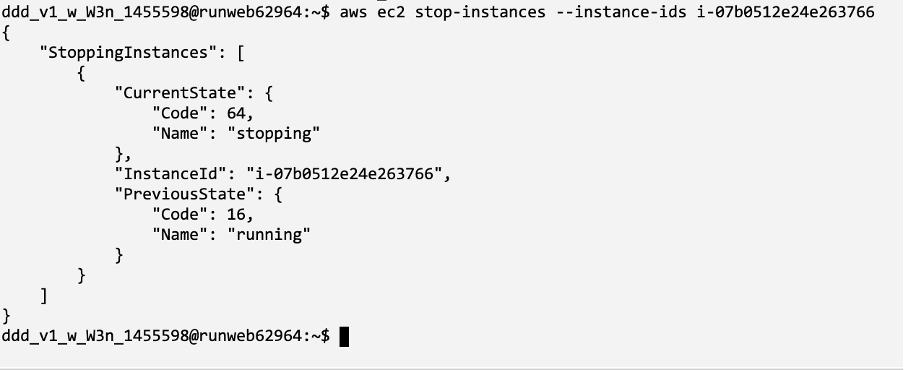
Figure 17: Describe instances Now try we will stop our instance using an AWS EC2 command. Run the following with your instance ID (see Figure 18): aws ec2 stop-instances --instance-ids [My-instance-ID] From the AWS Management Console, has your instance stopped? [Yes/No]
Figure 18: Stopping an instance Now we will restart the instance, with: aws ec2 start-instances --instance-ids [My-instance-ID]Has the instance re-started? [Yes/No] Now we will change the instance type from t3.micro to t3.small. To do this, run the following commands:
aws ec2 stop-instances --instance-ids [My-instance-ID]
aws ec2 wait instance-stopped --instance-ids [My-instance-ID]
aws ec2 modify-instance-attribute --instance-id [My-instance-ID] --instance-type "{\"Value\": \"t3.small\"}"
aws ec2 start-instances --instance-ids [My-instance-ID]
Did it change the instance type? [Yes/No]
Can you still get access to your instance?
By observing the script, and investigate what t3.micro and t3.small are, can you determine what has changed about your instance?
Now, revert the instance back to t3.micro, and suspend the instance.
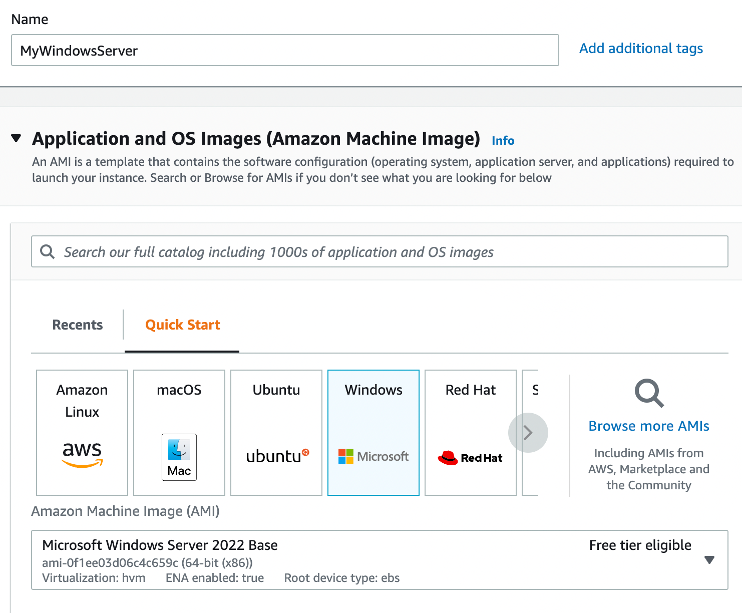
D Creating and Securing a Windows 2022 ServerIn this part of the lab we will create a Windows 2022 server instance with t3.micro (note, that this is very low for vCPUs and memory, so the performance may be a little lacking). First create a new instance, and give it a name, such as “MyWindowsServer” (Figure 19).
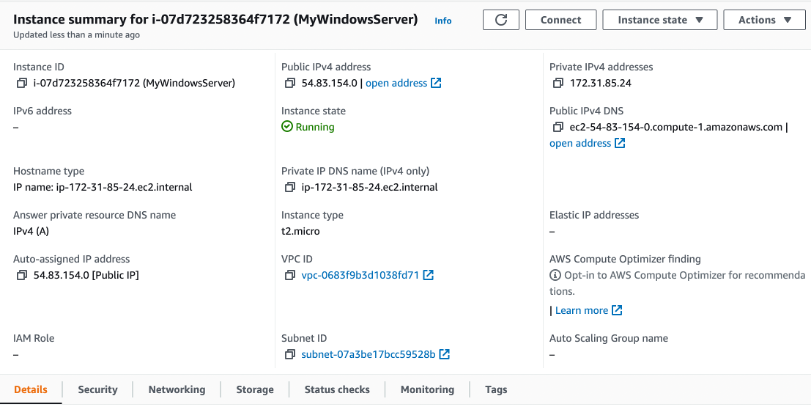
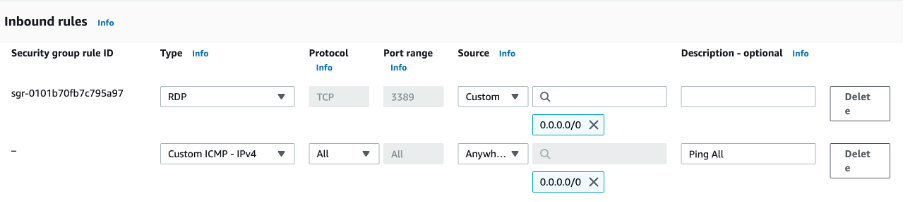
Figure 19: Creating Windows 2022 instance Now select t2.micro for the instance type. How many vCPUs will the instance have? How much memory will it have? How much will it cost per day to run? If you selected, t2.medium, how much would it cost per day? If you selected, t2.large, how much would it cost per day? Now create a new key pair and save it to your local drive. This file contains your private key, and which you will need to connect to your instance. Accept all the other defaults. Observe the firewall group that will be applied. Which firewall ports are open on the instance? What is the main issue with this firewall setting? How would you change it, once you have created the instance? Observe the disk storage setting for the instance. What type of disk will be used? [HDD/SSD] What is the advantage of using SSD? For disk storage, what is the size of the disk that you will create? What is the maximum storage size for a free tier storage of the AMI instance we are creating? D.1 Creating the instanceGo ahead and create the instance. Go back to the Management Console and find your instance. Wait for it to set its state to running. Now we will connect to it. For this we need to create an RDP connection, and use the private key we have generated to generate the initial password. Now, we will examine the details of our instance (Figure 20). On the instance summary, determine the following: The public IP address: The private IP address: The instance type: The public IPv4 DNS: From your local host, can you ping the public IP address? [Yes/No] Why can’t you successfully ping your instance? Which region of the world is your instance running in?D.2 Enabling ICMP on firewallNow we will enable ICMP on the instance. First click on the Security tab of the instance summary, and then on the security group. What is the firewall rule that is applied to the instance? [SSH/RDP/Telnet/FTP/HTTP/HTTPs] for [0.0.0.0/0 or 0.0.0.0/8 or 0.0.0.0/16 or 0.0.0.0/32] What does 0.0.0.0/0 represent? Now go ahead and add an ICMP rule for all hosts (Figure 121). Can you now successfully ping your instance? [Yes/No] We will not be able to ping the instance yet, as the firewall on Windows is disabling it.
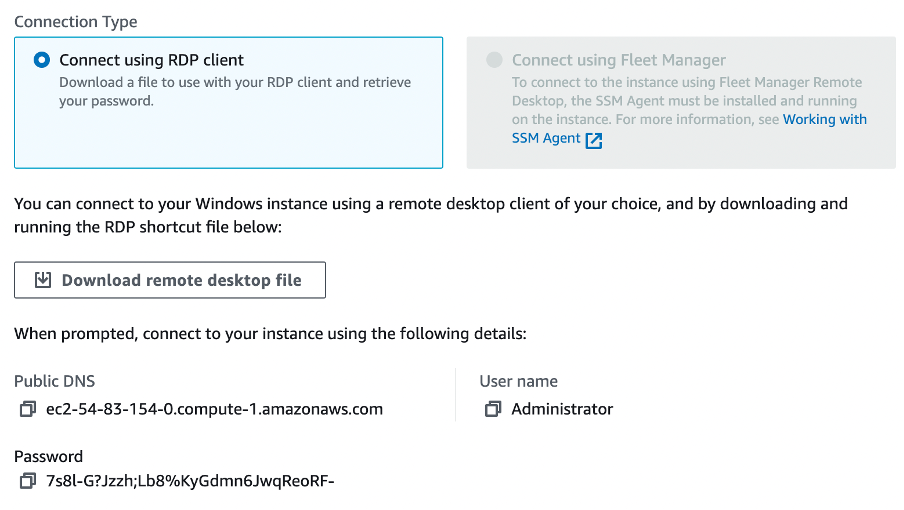
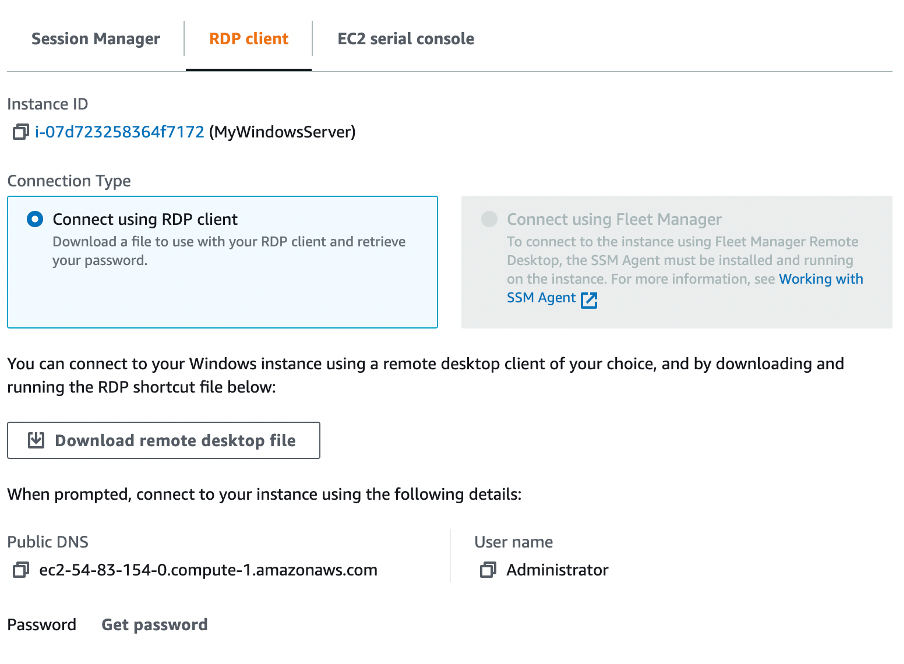
D.3 Accessing your instanceNow we will connect to our instance. For this you need RDP. Next Connect to instance (Figure 22). Click on “Get password” and present your PEM file, and it should reveal the password (Figure 23).
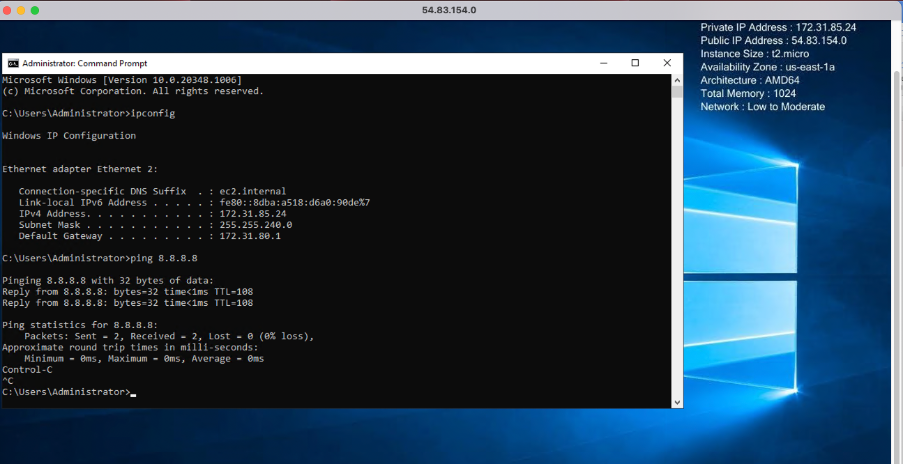
Figure 23: Reveal password Have you managed to connect? [Yes/No] (Figure 24) By using “ipconfig” in your instance, what is the private IP address of it? Can you ping 8.8.8.8 from your instance? [Yes/No]
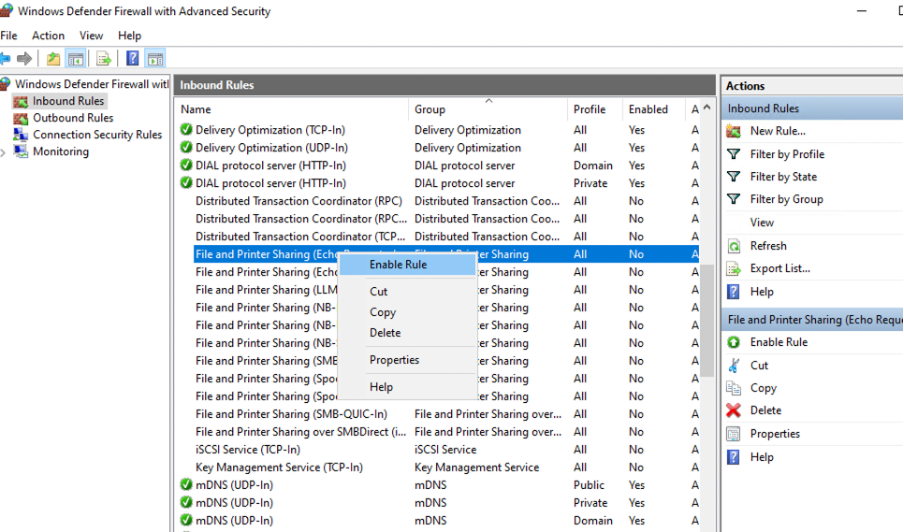
D.4 Enable ICMP on instanceWe have enabled the AWS firewall for ICMP. Now we will open-up ICMP in the instance. For this open-up with Advanced Windows firewall, and enable the rule for “File and Printer Sharing (ICMP-in) – as shown in Figure 25.
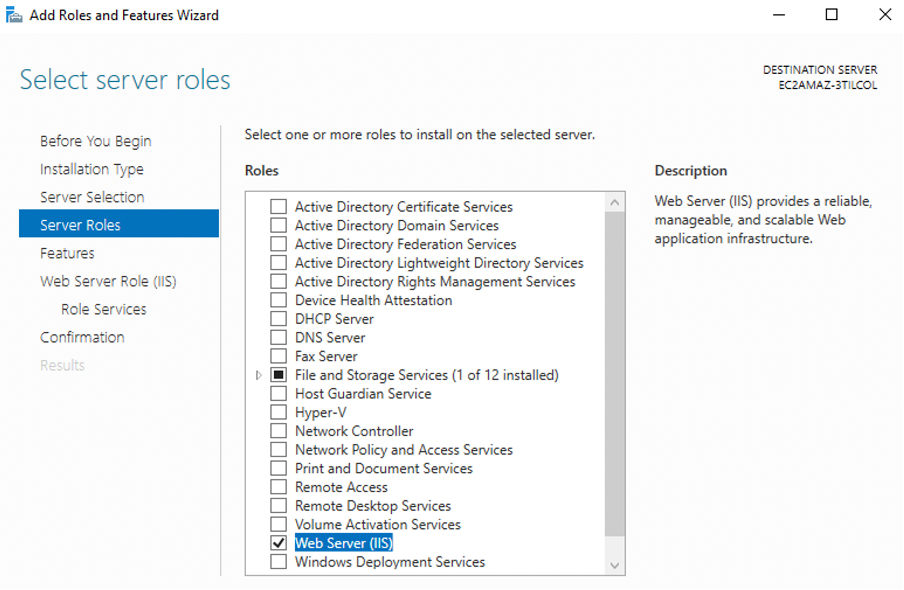
Figure 25: Enable ICMP Can you successfully ping the instance from your instance? [Yes/No] D.5 Show running servicesNow examine the running services on the instance with: $ netstat -i | grep tcp $ netstat -i | grep udp Which of the main services are running: D.6 Enable Web serverNow select Server Manage, and “Add a Role” for Web Server (IIS) (Figure 26).
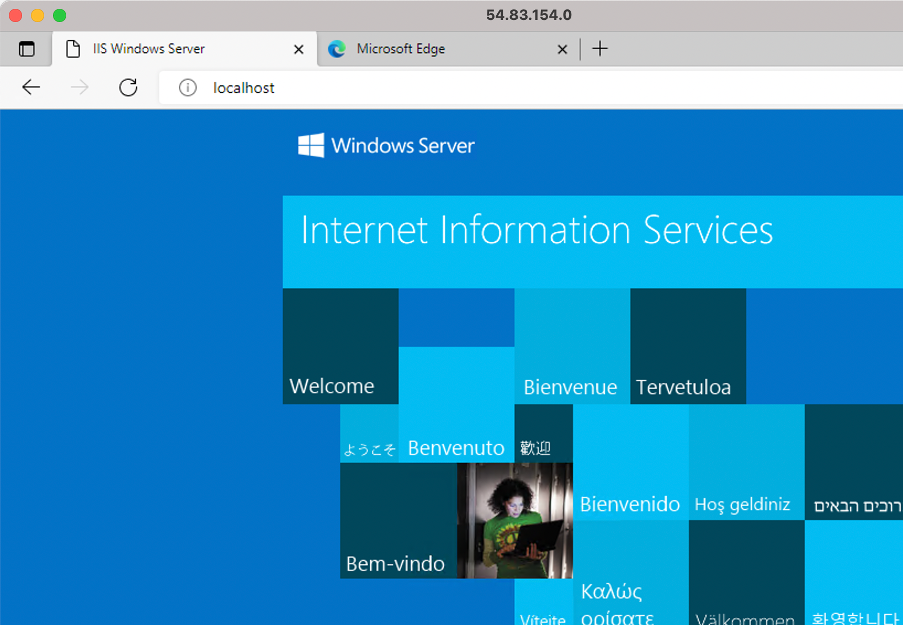
Figure 26: Enable ICMP Now open a browser on the instance, and access http://localhost Can you connect to the IIS Web server? [Yes/No] (see Figure 25) Now open up your AWS firewall for Port 80 (Figure 27).
Figure 27: Enable HTTP Now open a browser on the instance, and access http://[IP of AWS] Can you connect to the IIS Web server? [Yes/No] (Figure 29)
Figure 28: Local host
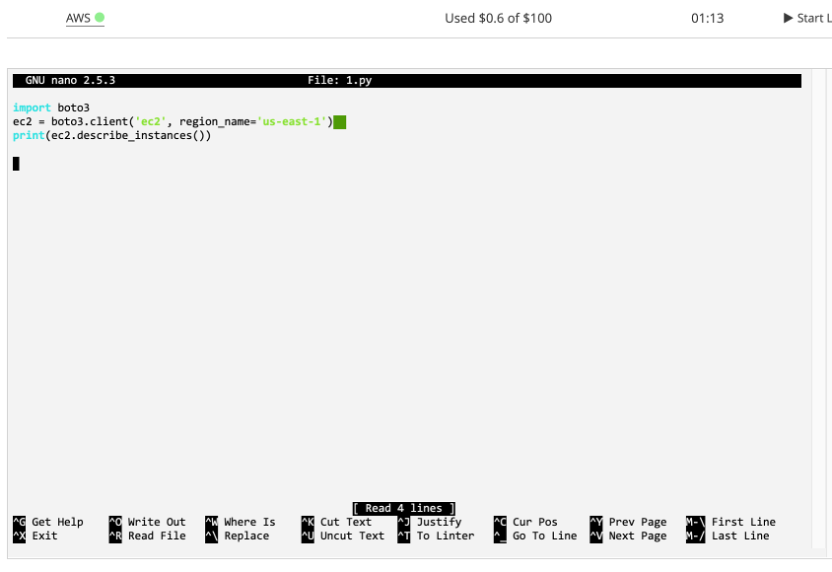
Figure 29: Remote access Now go into the /inetpub/www folder, and create a file named “iisstart.html”, and add: <h1>Main Web site</h1> <p>Hello to you</p> And then save the file. Has it changed the welcome? [Yes/No] D.7 AuditingThe main logging output is in the “C:\inetpub\logs\LogFiles\W3SVC1” folder. Identify the contents of the following files: Go into the “C:\inetpub\logs\LogFiles\W3SVC1” folder, and list the file in there. What are its contents? Can you identity your browser access? Which browser type accessed your Web server? Now try with another browser type, and re-examine the log/httpd/access_log file. Did it detect the new browser type? Now access a file that does not exist in your site (such as http://AWSIP/test.htm). Now re-examine the file. What is the status code returned for the access? D.8 Changing Administrator passwordWe can change the Administrator password, with something like: net user administrator mynewpassword$$7k1 E Python AccessYour unique account will have been generated, and you can access it with aws_access_key_id and aws_secret_access_key (from AWS details). You will also find that your console has been setup with the details already setup for you. For this, there is a hidden folder named .aws, and there is a file named credentials in there: ddd_v1_w_W3n_1455598@runweb63277:~$ ls -al drwxrwx--- 5 ddd_v1_w_W3n_1455598 apache6144 Oct 2 10:13 . drwxrwx--- 5 ddd_v1_w_W3n_1455598 apache6144 Sep 29 10:32 .. dr-xr-xr-x 2 ddd_v1_w_W3n_1455598 apache6144 Sep 29 12:08 .aws -rw-rw-r-- 1 ddd_v1_w_W3n_1455598 apache51 Sep 29 10:32 .gitconfig drwxr-x--- 2 ddd_v1_w_W3n_1455598 apache6144 Sep 29 12:08 .ssh -rw-r--r-- 1 rootroot3851 Oct 4 02:44 .termrc dr-xr-xr-x 2 rootroot6144 Sep 29 10:32 .voc ddd_v1_w_W3n_1455598@runweb63277:~$ cd .aws ddd_v1_w_W3n_1455598@runweb63277:~/.aws$ ls -al dr-xr-xr-x 2 ddd_v1_w_W3n_1455598 apache 6144 Sep 29 12:08 . drwxrwx--- 5 ddd_v1_w_W3n_1455598 apache 6144 Oct 2 10:13 .. -r--r--r-- 1 ddd_v1_w_W3n_1455598 apache 29 Oct 4 00:19 config -r--r--r-- 1 ddd_v1_w_W3n_1455598 apache 501 Oct 4 00:19 credentials ddd_v1_w_W3n_1455598@runweb63277:~/.aws$ cat credentials List the contents of the credentials file, and verify that it contains the same credentials as from the AWS details button. Are they the same? [Yes/No] Now create a Python file which will show your instances in the terminal window (such as 1.py):
import boto3
ec2 = boto3.client('ec2', region_name='us-east-1')
ec2.describe_instances()
Figure 28: Python file creation Save the file, and then run the file with Python3 and prove that it shows your instances (see Figure 29). !
Figure 29: Running the Python3 file Does the Python3 program show your instances? [Yes/No] Now we will stop one of our instances. For this, get an instance name, and add it to the following file:
import boto3
ec2 = boto3.client('ec2', region_name='us-east-1')
ec2.stop_instances(InstanceIds=["i-07b0512e24xxxxxx"])
Now run the Python file, and prove that it has stopped your instance. Does the Python3 program stop your instance? [Yes/No] Now we will restart one of our instances. For this, get an instance name, and add it to the following file:
import boto3
ec2 = boto3.client('ec2', region_name='us-east-1')
ec2.start_instances(InstanceIds=["i-07b0512e24xxxxxx"])
Now run the Python file, and prove that it has stopped your instance. Does the Python3 program start your instance? [Yes/No] Finally, write a Python3 program which will start both of your instances, and another one to stop them both. Do your Python3 programs work? [Yes/No] You can also use the AWS prompt. Now try to start and stop your instances with:
aws ec2 stop-instances --instance-ids i-07b0512e24xxxxxx and
aws ec2 start-instances --instance-ids i-07b0512e24xxxxxx Do these command line programs work? [Yes/No] |
|
 [
[